It’s best to limit the sound of the hi-hat on the snare mic, using a noise gate if necessary, if you have the available recording channels to mic your hi-hat separately. Small-diaphragm condenser mics work best for hi-hats. Look for a model with a cardioid pickup pattern so you’ll catch all the detail of the high frequency tones without picking up the fuzz of other drums in the kit.
Below are our recommendations for the 4 best hi hat mics on the market:
Hi Hat Mic 1: Shure SM81


Also excellent for a number of other applications—like miking acoustic instruments, especially guitar and piano—the Shure SM81 delivers a clean, accurate sound with a frequency range of 20Hz to 20kHz, making it perfect for hi-hat. It’s got a low distortion, a low noise level, and a low RF susceptibility, which combine to mean this mic will give you only the sounds you want with no unwelcome interference. The durable steel casing means it’ll be in your mic cabinet for a good long while, provided you take good care of it, and it’s been field-tested in a wide range of temperatures and humidities, so you don’t have to keep this one locked up in your studio.

Hi Hat Mic 2: Neumann KM 184
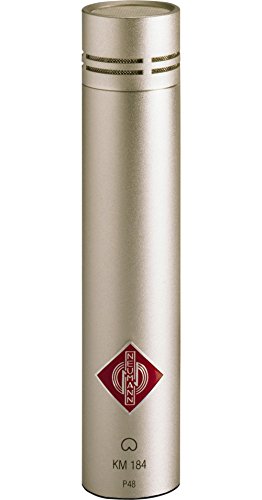
This mic is admittedly out of the price range of most home recording studios, but this list wouldn’t be complete without at least mentioning Neumann, the gold standard of audio recording equipment. The advantage of the KM184 (see full specs) is its ability to handle high sound pressure without overloading, up to 138 decibels. This makes it ideal for recording loud, brash, or sharply accented sounds without losing the nuance of softer tones—perfect for both brass instruments and percussion. This mic gives no coloration to the sound reproduction and has almost no self-noise. The accuracy and clarity of recordings made with this microphone cannot be surpassed by any other small-diaphragm condenser on the market. If you’ve got the money, this is the best hi hat mic period.
Hi Hat Mic 3: Audio-Technica ATM450

If you’re not looking to spend professional studio money but you still want to make professional sounding recordings, check out the ATM450. It’s got a frequency range of 40Hz-20kHz, which—though smaller than the range of more expensive models—still gives you everything you need for an accurate hi-hat sound. The integrated hi-pass filter lets you switch from a flat frequency response to a roll-off in the low end, giving the mic more versatility in both studio and live performance applications. Though the great sound reproduction is this microphone’s main selling point, the side-address design is an added bonus, giving you more options of how to position the mic—especially useful when you’re miking up an entire kit.
Hi Hat Mic 4: Samson CO2

For the ultimate value in small-diaphragm condenser mics check out the Samson C02. A solid stereo pair of condenser mics is the foundation of any professional microphone collection, and while the C02 will sound great recording a hi-hat, that’s certainly not their only application. The crisp response also makes these mics great for acoustic guitars, vocals, and hand drums, like congas or bongos, and you can use the stereo pair as overhead mics for a whole kit—a lot of options for such an affordable piece of equipment. No ifs and butts, this is the best hi hat mic for the money.
Hi Hat Mics — Phantom Power
When you’re shopping for condenser microphones, the vast majority you come across will require 48 volts of something called phantom power. Phantom power is an electrical signal for microphones that use active circuitry inside the mic. A condenser uses this phantom power to polarize its transducer, allowing the plates inside the microphone to move together and apart. Most mixing desks come with built-in phantom power supplies but you should make sure your equipment has a phantom power output before buying a condenser mic. Because they use phantom power, condenser mics need to be wired with XLR cables (see a ton here). Again, these are part of most standard recording set-ups, but make sure you have them on hand.
Setting Up the Hi Hat Microphones
Because of the wide variety of separate pieces at play, miking the drum kit will likely be the most complicated part of your recording set-up. If you have a limited number of mics or lines, you can get away with using just two overhead microphones. Small-diaphragm condenser mics often work well for this, and a stereo pair (like the Samson C02 above) would do the job nicely. Position one slightly in front of and one slightly behind the kit. The exact positioning of the microphones is going to depend largely on the specific components of the drum kit itself. While hi-hats radiate their sound horizontally, other cymbals produce soundwaves in a bipolar pattern above and below the plate. Experiment with shifting the microphones higher and lower until you find the balance that’s right for your ear.
If you’re able to add more microphones into your drum kit recording, your first priority should be miking the kick drum, snare, and hi-hat. These three drums form the basis of the groove and are the most important sounds to capture authentically to replicate a drummer’s true sound. The mic on the kick drum is going to take a lot of low frequency abuse. Look for a model designed for kick drums—these will typically be moving coil designs with very durable diaphragms. Position the kick drum mic along the drum’s edge, rather than the center of the head, to get the best sound balance.
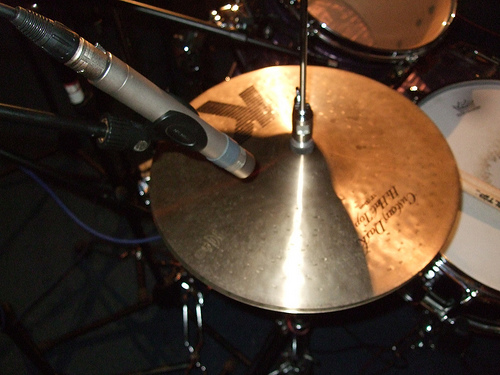
Both snare drums and hi-hats are best recorded with small-diaphragm condenser mics, both from a sound and a practicality standpoint. Because they’re so close together on a typical kit, the snare and hi-hat have a tendency to bleed into each other’s recordings. This effect can be reduced by using a mic with a cardioid pick-up pattern, but careful placement is key in maintaining the integrity of both your snare and hi-hat sounds. Position the snare mic a few inches above the drum head facing downward at an angle, then position the hi-hat mic on a stand a few inches above the outer edge of the cymbal, facing downward. Like with the overhead mics, you can tweak the positioning to get the exact sound you’re looking for. While some people will also put mics on the toms or a secondary mic under the snare drum, this 5-mic set-up is the foundation of a professional drum kit recording, and with this article, we hope you’ve found the best hi hat mic for your needs. Good luck!